
Version 3.5 last revised on 5/27/2001.
Any comments or suggestions please direct them to Dredger
This Version has been updated by Vorlon001
This Unlooper Guide is maintained and
hosted by The DSS Underground. Linking to this guide is ok, however
anyone interested in hosting this guide must first contact Deejay for approval.
We offer this unlooper guide in zip
file format for download in the DSS Underground member's files
section. If you are premium member you can download it from
there. But if you are not a premium member you can still download
this guide by just going to the file menu and select save. You
can then save the guide as an HTML document just like it would be
if you had downloaded the zip file and unzipped it.
Also there is a DSSU Programming Guide
available so check it out: Programming Guide
PLEASE READ,
VERY IMPORTANT:
The use, possession or importation of
Test (Programmed/Pirate) Cards is Illegal in the United States.
If you are a U.S. resident, you are required by law to subscribe
and use of Test Cards of any kind is unlawful and subject to
Criminal and Civil penalties according to U.S. law. We do not
condone use of Test Cards to U.S. residents. You and you alone
are SOLELY responsible for abiding by the laws of your Country,
State, Province or Territory. THE DSS UNDERGROUND WILL NOT BE
HELD RESPONSIBLE FOR THE ACTIONS OF THE PEOPLE USING THIS
DOCUMENT. This Unlooper Guide is strictly for EDUCATIONAL
USE ONLY. Also the DSS Underground also does not
and will not take any responsibility for what might happen to any
card using the following procedures. In other words, USE THIS UNLOOPER GUIDE
AT YOUR OWN RISK.
So with that out of the way let us say
that what we are trying to offer here is a basic and simple
instruction that hopefully will make everything as easy for you
as possible. We also want these instructions as safe as
possible, meaning we want to try our best to avoid having your
card become damaged. But remember nothing is absolutely foolproof
and don’t let anybody ever tell you differently. There is
always a risk taken whenever you attempt to clean an H card. But
also at the same time if you follow certain precautions you can
lower those risks and that is what we have tried to do with this
guide. But sometimes people, when they run into an error or when
they get confused about what they are doing, will guess or
attempt to try things on their own resulting in creating possibly
a more serious problem. If during any of the following
instructions you should get any kind of error message or if you
become confused and don’t understand something stop
immediately, make note of any on screen message(s) and then
go to the DSS Underground
Unlooper Forum and seek
out advice. Usually there is always somebody online that will be
more than glad to help you out. If you do need to seek out help
again please be specific when posting your problem and also give
as much detail as possible. Also it is strongly recommended that
you thoroughly read through this whole guide before you actually
attempt to do any of the offered instructions. Also just to point
out, this guide is geared to The WildThing II (WT2) unlooper
technology, which also includes WT2 clones. Because of the many changes in the
recent months, we have added better coverage on the WT-X and the latest
Winexplorer4.51 by Dexter and the latest TurboUnloop scripts from AOL6945 as
well.
Advice and Recommendations
Before we go on any further lets cover a
few things. First off even though the pricing for unloopers has
recently dramatically been reduced unloopers are still not for
everyone. If you have never programmed an H card using an ISO7816
Compatible Programmer then I strongly suggest that you stop right
now and rethink this a bit longer. First off you cannot program a
card with an unlooper. We will mention here that recently, there
have become available, unloopers that also have a programming
function. DSS software programs like WinExplorer and BasicH
cannot be used with an unlooper. You must be in the programmer
mode to use these programs. You cannot install stealth scripts
like SummitStealthPro or DssStealthPro with an unlooper. These
programs and programming scripts require a programmer. An
unlooper actually serves only two primary functions. It is used
to unloop (also known as fixing) or clean H cards by returning
the EPROM Image of the card nearly back to a virgin state. Second
it can be configured using specific unlooper software to write
Images (not to be confused with bin files) to H cards. Now in the
hands of the right person the unlooper can do these tasks very
fast and very efficiently. But again in the hands of the wrong
person it can just as quickly and efficiently turn that H card
into an ice scraper. So we strongly suggest that really think
long and hard before deciding if an unlooper is for you.
What To Expect Or Better Yet Not To
Expect Out Of This Guide
Well let this be sort of like a disclaimer. Don’t think that by just using this guide it will make you proficient in the use of an unlooper. This guide will hopefully help some but it really takes a lot of experience and patience to learn the tricks of the trade and thoroughly master an unlooper especially when dealing with severely looped cards. There are far to many variables involved and since there is just no way for a guide of this type to cover all aspects of using an unlooper we have to once again stress that what you will learn from this guide will be limited since again we can and will only cover the very basics. Also if you only have one H card or a limited number of H cards then it just won’t be cost effective enough for you to buy an unlooper especially if money is any issue with you at all. The average cost of basic card cleaning is now only $10-$20 so you do the math and determine if it’s really worthwhile. But if you absolutely need to have one for whatever reason then continue on and hopefully we can help answer some questions and instruct you with some of the basic functions with using an unlooper. But again as far as giving thorough instructions especially with badly looped cards please do not expect to find that kind of instruction with this guide. This is strictly geared as a basic guide for beginners only.
Because
of the size of this HTML file and it's pictures, it is recommended that you save
this entire web page to your computer. You can then always have it for reference
and it will load faster! A zip version is available in the files section of the
DSSUG.
What You Will Need To Do To Get Started
First off of course you must already have
or plan on purchasing an unlooper. There are many to choose from
with a wide range of price tags. The DSSU of course recommends
that you consider purchasing an unlooper from one of our dealers
on the DSS Underground who by purchasing banners help to support
and maintain the site. You can find these banners at the top of
the DSS Underground Forum pages or if you go to the DSSU main page
there is a link called “sponsor’s list” which will
list all advertisers, some of which do sell unloopers. Also for
recommendations you can go to the Product and Service
Recommendations Forum.
When deciding on an unlooper, try not to let pricing be the only
consideration. Yes pricing is important but quality is even more
important when considering an unlooper. Unlike with ISO7816
Compatible Programmers, where just about all programmers are
basically very good and do pretty much the same job, unloopers
are much different. Not all unloopers are equal and you should
really do your homework before investing your hard earned money.
Also since an unlooper again cannot program your H card you are
also be required to have a programmer as well. Lately many
dealers have started to offer deals that include a programmer
along with an unlooper. Also recently combo units where the one
device can do both unloop as well as program your card have
started to come on the market. So if you do not already own a
programmer you might want to consider that option. (Note: for
information pertaining to using a programmer and programming an H
card please download the DSSU Programming and
Cloning Guide.)
Once you have
an unlooper then you will need software. Below is a list of files
that we recommend and will refer to in this unlooper guide. All
the files are available for download from the DSS Underground
Members File Section.
However you have to have a premium membership to be able to
access the files section. If you do not have a premium membership
then you will need to locate these files at some other site. Do
not email either Deejay or myself asking where to find these
files because we will not reply to such inquiries.
Since the unlooper scene has changed in the
past few months, this guide will now reference all of the
currently available unlooper programs to some degree. For
beginners, Wildthing 3.0 that has been documented here, is still
the recommended basic program to start with. It is the easiest
and safest of the Wildthing program to use. The Prog.exe program
is now available in the DSS Underground
Members File Section as a
complete DOS package, containing many images, and all of the DOS
unlooper support files. Prog.exe and the other DOS programs will
not run in the DOS shell that comes with Windows 2000 so if you
end up needing to run this program you will need to either be in
pure DOS (booting up the PC with a DOS boot disk) or Windows
95/98. Now there are many other DOS based programs out there for
the unlooper but most of them are more specialized for specific
problems and generally take a real good understanding of
unloopers. Most if not all if not used correctly can easily
destroy a card (M.exe is a perfect example). So with this guide
we are not going to cover any of those DOS programs and will
focus primarily on the unlooper programs themselves. Also
required will be a program called WBIN2IMG.exe, which is, a
required stand-alone program used for converting bin files into
Images files. Adding to this list, another useful tool is
Dexter's Hex Tool. Also versions of BasicU by Dexter have been
added to this guide and are also available in the DSS Underground
Members File Section. At
minimum, BasicU.06 is recommended and BasicU.04 can also be
useful at times.
WildThing 3.0
Wildthing 4.0 (A beta version of 4.1 that is buggy but has fixed a few cards)
Wildthing 4.1 (Also buggy but has fixed many cards)
Wildthing 5.0a later version that fixed many of the 4.1 bugs
Wildthing 6.0 and the crack program for it
WT6-2v1 or WT6-2v2 to replace the above WT6.0 executable, once it is installed. It is for clones.
WT6.5 to use with the WTX atmel code. The latest from Triton.
BasicU .04 (Original unlooper software release by Dexter)
BasicU .06 (Latest version of Dexters Unlooper software)
PROG.exe
Su2.exe and Su2v2.exe These DOS programs by Studluv069 that improved upon Prog.exe.
Winexplorer4.51 This, allows the use of scripts with an unlooper. The best example is Turbounloop1.0 and 1.1b3 bets by AOL6945. These are unlooping scripts!
WBIN2IMG.exe
WinZip 8.0 (download only if you do not
already have a utility to unzip files)
RS232.exe (download only if you have a
problem connecting your unlooper to a comm port)
Other useful files to round out your unlooper programs:
Hex Tool by Dexter (a useful difference image creator)
Eeprom Tools (a useful bin cleaning and altering file)
Zkt2bin.exe (a useful cloning file)
ULEdit.exe (a useful image editing program that automatically calculates a new checksum after a file is modified.)
Recent Unlooper Developments
In the last month, some changes have come about due to the availability of different Atmel chip code for these machines. Below is a brief summary:
WT I Atmel chip (The original WT code for DOS)
WT II Atmel chip (The most commonly used chip with Magic ECM enhancements)
WT-X Atmel chip (The latest chip from Triton)
SU2 Atmel chip (This chip is coded like the WT II chip but has added function to accept the Su2v2.exe Dos program, functionally like WT 3.0 Windows program)
Versions of the WT chips above that allow an unlooper to be used as a programmer. These codes are referred to as the Plus codes. They allow the unlooper to be used in the Phoenix Programmer Mode.
Versions of the WT chips above that allow an unlooper to be sued as a programmer for BS cards. These are the ECM'ed cards that have the bootsector trashed. These are referred to as the Atmel bs codes.
Because of the changes, it is currently recommended that you use the basic WT II chip. With the advent of the cracked WT Software, you can use the later versions of the software with this chip and keep the functionality of the earlier software. This is very important because of the fact that when one version of the software doesn't fix a card, another might!
Installing the Software
One warning about installing WT Windows software. Install Wt 3.0 first! Install 4.1 second, 5.0a third, WT6, and the WT6.5 version last. This order keeps the Registry confusion between programs to a minimum. There have been known registry conflicts with different versions of this software!
OK so now we will continue under the
assumption that you have located and downloaded whatever files
you need for using this guide. If you do not already have a
utility for unzipping files in .zip format then hopefully you
located and downloaded WinZip 8.0 and installed it already. Then
go ahead and unzip all the other software you located and
downloaded. PROG.exe and WBIN2IMG.exe do not require installation
after being unzipped but when you unzip WildThing 3.0 it will
offer to install as part of the unzipping procedure. At that
point just select “Install Now” and follow the
installation instructions. It is very important though when it
asks if you want the setup in the following directory (should be
C:\Program Files\WildThing!) that you make sure to keep it in
that directory. If you put it into a different directory, then
because of the way the program is written and uses the registry
you may have problems when you try running the software. So at
this prompt just select “Next” as well as the next
prompt as well. When finished just click “Finished” and
then close WinZip. The programmed is now installed and can be
accessed just like any other program. But also in the Programs
Folder when you select the Start menu you will see a folder
called Smart Card Prog. In this folder you will also see a
shortcut to the WT3.0 application. This is just another option
available to you for launching the WT3.0 software. If you prefer
you can of course create a shortcut on your desktop for the WT3.0
application as well.
Now go to the Program Files folder on your
C drive and open the WildThing! Folder. Familiarize yourself with
especially the two folders called Dumps and Img. You will use
these two folders later when creating Image files. It will be
assumed that if either of these folders are referenced later in
this guide that you will know what they are and where to find
them without the need to detail it any further than just the
folder name. Also you will see WT.exe, which of course is the WT
3.0 application. If you prefer to have a shortcut on your desktop
for the WT 3.0 now is a good time to go ahead and do that. The
other files you see are not really anything that you need to be
concerned with. There is a file called wt.doc, which is the
WildThing documentation. It is recommended that you read this
document but also depending on what unlooper you own some of it
pertaining to the lights on the unlooper may not apply correctly
for you. But most of the document does explain the main program
screen and describes the different options and button giving some
description as to what each button does. As you go on with this
guide it will be assumed that you have read this document and
that if a button or function is mentioned you will understand we
are talking about. We just don’t have enough time to detail
everything as we go along and have to assume that you understand
what we are talking about. So again read this document.
Now just a quick note about a file that is
not found yet in the WildThing! Folder but will appear right
after you run the WT 3.0 application for the first time. The file
that will be created is called speedup.dat and this is a pretty
unique file not even mentioned in wt.doc for some reason.
I’ll try to explain what this file does the best I can in
simple terms. Information about fixing every card that you ever
put through your unlooper is remembered and saved in this file.
It is claimed that the unloopers actually get smarter with the
more cards that they fix making them actually become faster since
instead of having to figure what to do it has saved history to
fall back on and to reference. You will often see speedup files
available on sites that offer unlooper software that carry claims
of having a history of hundreds if not thousands of cards. So it
only seems logical that you may want to go to one of these sites
and possibly download one of these speedup files and replace your
speedup file. But we’ll leave that totally up to you. One
note however is that speedup files are unique to the version of
WT software you are running. So if you do elect to do this you
have to make sure that the speedup file you download is a speedup
file for WT 3.0 only and no other version (which also includes WT
3.1).
Next unzip WBIN2IMG.exe and put into the
Dump folder (hopefully as talked about above you will remember
this folder). There is a reason for this, which will become more
apparent later on. So for now just do it.
The last file we want to talk about is the
PROG.exe. When you unzipped it you ended up with seven files. So
now just create a folder on your C drive. You can call it
anything you like but something like DOS Unlooper Files should
work well. Then just make sure all seven of the files that were
unzipped are put into that folder. Hopefully you will not have a
need to really use these files when it comes to basic card
cleaning since the Windows based WT 3.0 will be what you will use
a majority of the time. But you may need the Prog.exe since every
once in awhile you will get a card that you will not be able to
fix with the WT 3.0 software and will require running this DOS
program. But generally all that will be needed for basic card
cleaning will be the WT 3.0 software.
If you installed the complete WT DOS package, you will have a number of programs that are included. You can place these in in a directory called WTdos or whatever, but keep all files, especially the image files, in the same directory as Prog.exe or the program will not be able to find the image files.
With the software now all installed you
will of course need to connect the unlooper to your PC and make
sure that it is functioning. That is what the file called
RS232.exe is used for. Run the file and it will give you a
listing of four comm ports. If you click on a port it will ping
or go out and verify that the port is open and that it can talk
to your programmer. If you watch the light(s) on the unlooper one
of them may flash when you click the appropriate comm port
(generally comm port 1) that the unlooper is connected to. If you
see no light flash then either your unlooper lights do not flash
when you ping the port (not all unloopers are the same) or
possibly you will need to configure the port. To do this requires
that you to go into the computers BIOS. This is something that is
different from computer to computer so we recommend that if you
do not know how to do this that you seek help in doing this.
Setting Up And Configuring The WT 3.0
Software
Note: one of
the characteristics of the WT software is that each time you
launch or start up the software it will do so in the Fix Card
mode setting, which happens to be the default mode setting and
also the mode setting for cleaning a card. Now if you already had
your card in the unlooper when you first ran WT 3.0 then the
software will immediately write the fixbin (fix card) image onto
the card thus cleaning the card. This may not be something that
you really wanted to do especially if it happens to be a card
that you only want to read the image from and not to actually
clean the card. Now in most cases this is probably exactly what
you will want to do but just be aware of what will happen if you
have the card in the unlooper when you launch the WT software.
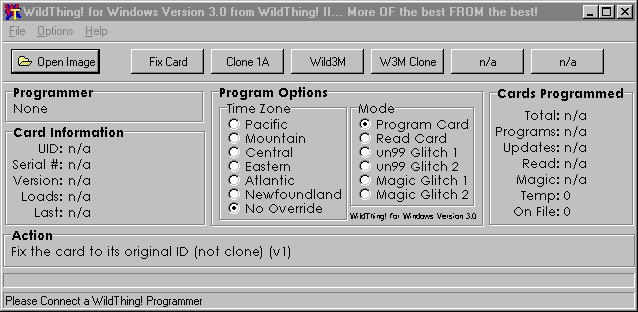
Now we’ll talk a bit about the main
program screen of WT 3.0 and the Image files that can be used. Go
ahead and run the WT 3.0 application. In the main program screen
you will see a button called “Fix Card”. This button
does exactly as it is titled. It will attempt to fix a card by
writing a near virgin Image onto the card. It will NOT replace
the card’s CAM #. The file this button accesses is called
“fixbin.img”. It can be found in the “Img”
folder (again remember what was talked about above about knowing
these folders and their locations). Some people prefer to create
their own fixbin file instead of using the one that comes with
the software. But this is totally up to you. But if you decide to
do this you will need to have either a good clean H card, one
which you know the history about, or a good clean bin file. You
really want this fixbin file to be as close to being virgin as
possible and not a card or bin that has previously had
programming. So unless you have such a card or bin I’d
recommend just using the one that came with the software, which
should be fine anyway. But for those who want to create and use
their own fixbin then that will covered shortly.
Now just to the left of the Fix Card
button you will see a button called “Open Image”. Once
you have created image files (see below) or you have an existing
image file, they will be stored in the “Img” folder,
which can be found in the main WT3.0 folder along with two other
folders called “Dumps” and “Fonts”. The
“Open Image” button should and does point to this
“Img” folder, which allows you to then select a
specific image file you may want to use to load onto a card. This
is one of two ways to select an image file. The other way is to
select one of the five other buttons to the right of the Fix Card
button. They should be labeled “Clone 1A”;
“Wild3M”, “W3M Clone” and then two button
with no programming at all (n/a). These buttons are linked to
Image files again found in the “Img” folder. These
buttons can be used to write a specified Image file to a card
after the card has been fixed or cleaned. Now these are files
that you will most likely want to replace with your own Image
files since you will want Images setup with the programming and
possibly the clone (CAM #) of your choice. Also the button
themselves are programmable and can be edited which is discussed
and explained below.
Let me just make a quick point right here.
You can just use the unlooper to do nothing more than fix or
clean cards. Once the card is fixed or cleaned you can then just
go ahead and take the card back to your programmer and write the
script of your choice to the card. Or by taking some time you can
also create personalized Image files, which you can then use the
unlooper to write to the card. Believe me this will be something
that you will want to do if not right away then eventually. The
unlooper will take only seconds to first clean and then write a
completely programmed Image file (which can also be a clone of a
sub’d Image as well) to the card. But it will require that
you first use your programmer to create a programmed card
configured to however you want it configured. Then it’s only
a matter of reading that card with the unlooper, which will save
it as a bin file and then converting that bin file into an Image
file. It’s really not that difficult and really enhances the
use of the unlooper. But again you also do need a programmer to
do all this.
So assuming that you will not want to use
the Image files that are already configured to those buttons then
lets explain two different ways how we can get those buttons so
that they are no longer linked to the file they are now linked to
or to no file (or empty) at all.
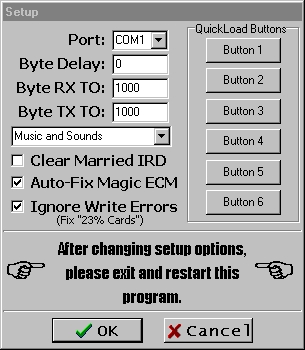
OK first the easier of the two ways. If
you want to just replace the file that the button is linked to
all you need to do is select the option menu while in the main
program screen of WT 3.0. You then choose “Setup”.
While in the Setup window click on the button that you want to
change. Then just select a different Image file. Then select
“Open”, then “OK” and then you need to quit
out of the WT 3.0 application before you will see any changes.
Now run WT 3.0 again and you will then see the change in the
button. It’s really pretty easy. However the second way to
change these buttons and the only way to make then totally empty,
you will need to do something that you will have to be very, very
careful about. Just do exactly as instructed and you will be all
right. We now must go in and edit the registry. The reason I say
you need to be careful is that by doing this you are messing with
the operating system of your PC, so please make sure to do only
what you are instructed to do or else to could really screw
things up. So first of all quit the WT 3.0 application and then
follow the following steps:
� Go to the start menu and select
“Run”
� In the window type: regedit
� In the registry Editor window open:
HKEY_LOCAL_MACHINE \ SOFTWARE \ SmartCard Prog \ WildThing!
� Now over in the right hand window if
you look under the name column about halfway down the page you
will see ImgButton1FileName as well as five more labeled
accordingly just below that one. These are the actual button that
you saw in the main program screen of WT 3.0. If you look just to
the right of each of these under the data column you can see the
files that each button is actually linked to. All you need to do
now is double click on each of the names and it will open up the
Edit String window. The string will or should already be
highlighted (or selected). If not then do so. Then all you need
to do is hit the backspace key on your keyboard, which will
delete the string and then select “OK”. That specific
button will now be empty. Go ahead and do this for any of the six
buttons that have data attached.
� When finished with all six buttons just
close the Registry Editor window. That’s all there is to it.
Now you may want to go to the
“Img” folder and remove all the Image files, except the
fixbin Image file, since you really have no need for those files
(unless you plan on using the default Image files that came with
WildThing 3.0. However by now these Image files may be outdated
especially as far as current USW updates). Then go ahead and run
the WT 3.0 application. Now all six buttons should be empty (n/a)
if you did everything correctly.
So now just to show you one time how to
actually program these button when empty we will now configure
the first button that use to be “Fix Card”. We will go
ahead and use the original fixbin.img file that came with the
software for this exercise (thus the reason for not removing it
from the “Img” folder). So now do the following steps,
which are pretty much the same as what was used above when we
reconfigured one of the buttons:
� Select the Options menu
� Then choose Setup
� When the Setup window is open click on
the top button “Button 1”
� This should open a typical open window
for browsing to whatever folder you want to go to. Hopefully it
should default to the “Img” folder. If not browse to
that folder.
� Select the fixbin.img and choose
“Open”
� You must now select “OK” and
then also quit out of the WT 3.0 application.
� Once again run the WT 3.0 application
and you will now see that the button is again labeled “Fix
Card”
Now you have been shown how to edit
buttons. Editing or programming any of the other five buttons
will be done in the exact same way. This pretty much covers
configuring the WT 3.0 software.
Creating Image Files
OK now since we have empty buttons
available in the WT 3.0 main menu screen lets create an Image
file that then can be added to a button for easy access. This
again will require a programmer if you are to do this from
scratch. Remember that the unlooper cannot program or write
scripts to a card. So it is recommended that you follow the DSSU Programming and
Cloning Guide and get a
card programmed (also cloned with a sub’d bin file since we
do want a card that is valid and working). So now we’ll
assume that you have already programmed a card that is exactly
configured to the way that you want it. So lets say that the card
is a cloned card with SS1.2a installed. Then follow these steps:
� Start the WT 3.0 application
� When at the main menu window look under
the Program Options/Mode (middle of screen) and select “Read
Card”
� Insert the card that you just finished
programming
� After it finished reading you will get
prompted to name and save the file (it will be saved as a bin
file). Also it will be saved into the Dump folder
� Now you can remove the card from the
unlooper and quit the WT 3.0 application
� Open the Dump folder and run
WBIN2IMG.exe
� In the Windows BIN to IMG Converter
window you want to first locate the bin file you just read and
saved. If you look over to the far right of the Input File window
you will see a small folder icon. Select that folder and you
should open up in the Dumps folder. If not then browse to that
folder. Then select the bin file that you just saved and click
“Open”
� Now just below you will see a
description field. This is where you will give this file a name
and this will be what you will see in the button (ex: remember
how the fixbin file showed up as Fix Card). So give it an
appropriate name that you will understand.
� Next you have to decide if this Image
will be a cloned Image or a non-cloned Image. Cloned Image when
written to a card will replace the CAM #. A non-cloned Image will
not change the CAM # of the card being written to. In this case
since the card you programmed and then read was a cloned card
then you do want to save this Image as a cloned Image
� After selecting cloned or non-cloned
then just select convert. Now there is a small thing that sort of
bugs me with this step and have never been able to figure it out.
It will save the Image file in the dumps folder. If right before
to do the convert you try to change folders for the output file
it won’t let you. You can go in and edit the string in the
output file window changing the folder from Dump to Img or just
say screw it and save it to the dump folder and then just
manually move it to the Img
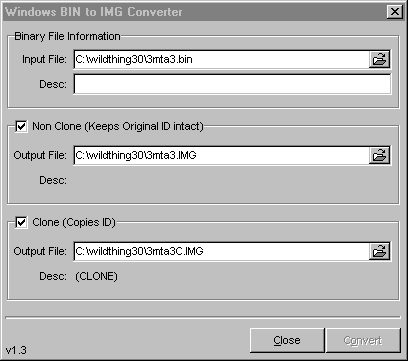
� Quit out of WBIN2IMG
� This next step is something that was
recommended to me those who deal with Image files all the time so
I have added it to this procedure since they know a hell of a lot
more than I do about this stuff. Now other people claim that it
isn’t really necessary but on the other hand I have been
told that is does make the Image file correct as far as making
sure that the config bytes match the fuse setting. Apparently when
WBIN2IMG.exe converts and creates bin files something is lost
during the process. If you have created an Image file with a
3M script like Aktivator or Rampage installed then the fuse
byte setting should be 25. So you will need to delete the config
line and type :00250A01D0. If you have created an Image file with
no scripts installed like a Fixbin file then the fuse byte
setting should be 00. So you will need to delete the config line
and type :00000101FE if that line was not already correct. So
what you need to do now is open the Image file using the notepad
or WordPad. These utilities should be part of the Windows
software. The Image file will open up like any other text file.
Now to determine the fuse setting go to the top of the Image
file’s text and look at the first line of code. The
following example is a cloned card with DssStealthPro30C
installed. Here is the top line of code from the Image.
#Pro30C Clone (CLONE)
#30C Clone
: 1080200025DA440D010312200000000000000000CA
Your Image file should look very similar
and the only thing to really look at should be the section of the
line we example above which we have bolded for the purpose of
making it stand out. Normally it would of course not be bolded.
This will be the fuse byte setting and since the card again has a
script installed it should be and is 25. If the Image you
had open was an Image file with NO SCRIPT installed (such as
again a Fixbin file) file then instead of 25 this fuse
byte setting would be then be 00.
Now go the bottom of the Image file’s
text in the notepad or WordPad and look at the last line of text.
Again using the above Image file of DssStealthPro30C as the
example the last line of code is as follows:
:00FF0201FE
Now your last line may look like this or
maybe not depending on what was on the card. But if it is a 3M
stealth script on the card then the last line should be changed
to:
:00250A01D0
And again if the Image file has no script
installed like a fixbin Image file then the last line should be
changed to:
:00000101FE
Now this has all been with assumption that
the card is either a clean Image or one with a 3M-stealth script
installed. If you are using some other script other than a 3M
script then I suggest that you research what you need to do to
edit the config line.
� You will now be able to go ahead and
add the newly created Image to one of the buttons like we did
earlier above
� When done you should now have a button
ready to be use with a programmed cloned Image
So that is how you create an Image file
and have easily accessible with the WT 3.0 software. We mentioned
earlier about possibly creating your own fixbin file. Well the
process is the same except that since there is no programming on
the card you can just save it in BasicH as a bin file or if you
have a good clean bin file saved already you can just run
WBIN2IMG.exe and then open the bin file directly and covert it to
an Image file (fixbin file should also of course be a non-clone
Image file). This eliminates the need of doing the Read Card step
like you need to do with a fully programmed card.
Cleaning Or Fixing A Card
In most cases you will want to take a card
that needs simple cleaning like possibly a card that has
programming on it that you or somebody couldn’t remove
because the script is preventing the E3 hole to open and you
don’t know what the script is or what the backdoor password
may be. This is where the unlooper really shines. All that you
have to do is open WT 3.0 and when you get to the main menu
window select your fixbin button (most likely called Fix Card).
Then just insert the card and you should see the activity bar in
the action window at the bottom of the main menu window move
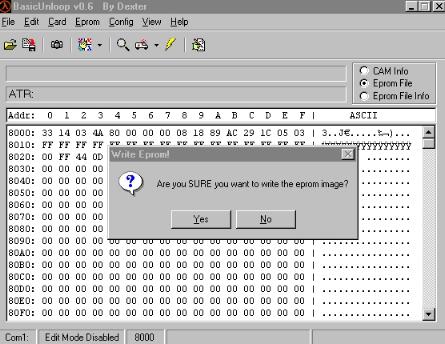
across. When done it will say completed. The card is now clean.
To do another card just remove the first card and insert the next
card. Each cleaning will take less than 5 seconds. And
that’s it, fast and simple.
However it isn’t always quite that
simple. If you have a card that is truly looped then the real fun
and frustrations can begin. Whenever you put a looped card in and
attempt a fix you will get much different results. You will see
the WT 3.0 software attempt to read the card and eventually fail.
This will indicate a looped card. So you will now have to select
each of the four mode settings starting with un99glitch 1 and
working thru each of the other three remaining modes (un99glitch
2, Magic Glitch 1 and Magic Glitch 2) as each mode fails,
repeating them in sequence again and again until the card finally
snaps out of the loop. When this happens you will know it right
away. After it successfully snaps out of the loop and finishes
whatever glitch mode you were in you should then be able to clean
the card with your fixbin Image. But this process of snapping the
card out from being looped can sometimes be pretty quick or
sometimes never or anything in between. All you can do is keep
trying over and over again. Now earlier in this guide I mentioned
how over time you learn the tricks of the trade through lots of
experience. Well this is exactly what I was referring to. There
are different things that experienced unloopers will try like
changing voltages or possibly running other specialized software.
But as I said earlier this guide is for the basics and I am not
going to get into all the variables and all the different things
that experienced unloopers have learned after doing hundreds and
hundreds of cards. If you get a card that you just can’t
unloop I recommend that you either seek out advice in the DSSU
Unlooper Forum or send the card out to an experienced unlooper
service.
PROG.EXE
Now you do have the PROG.exe program still
available to try. Sometimes this DOS program will work where the
WT 3.0 will not. So you might want to go ahead and run the
PROG.exe, which should be in the folder (maybe DOS Unlooper
Files) you were asked to create after you unzipped it. Also
please note that if you are running Windows 2000 then you cannot
run this or any of the other DOS based DSS programs from Windows
2000 itself. Windows 95 and 98 will work ok but not Windows 2000.
So you will need to reboot your PC using a DOS boot disk, which
has PROG.exe (and the required files used with PROG.exe) also on
the disk. Just reboot the PC with the disk in the floppy drive.
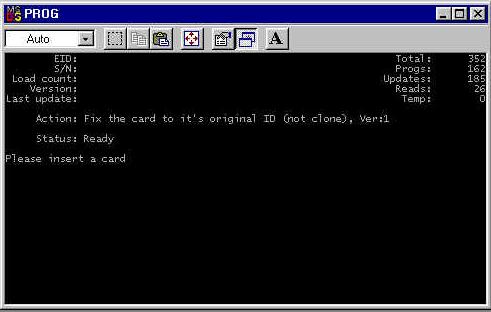
It will boot you into DOS and when at the A prompt just type
“prog” (A:\prog). This command is of course the same if
you are running in DOS while in Windows 95 or 98. When the DOS
window opens up by looking at the action line, you will see that
the system should be ready to restore/unloop your card back to
its original ID (not Clone). All you have to do then is slide the
card into the card slot of your unlooper. If it is successful the
program will tell you it’s complete and that you should
remove the card. However if it’s unable to fix the card you
will get an error generally saying that there was read error. You
can keep trying this as many times as you like or alternate
between the two programs (PROG.exe and WT 3.0). Maybe you’ll
get lucky, maybe not.
When Prog.exe starts, a program is activated that checks all of the images in it's directory. If an image is bad, it will be flagged by the program as not being acceptable. The + and - keys will select the image that will be used by the program. You can chose from fixbin.img, virgin.img, clone.img, or any other image file that you have in that DOS directory with Prog.exe. Prog.exe has no facility for repairing 10/6/99 Magic ECM cards.
In the full DOS package of the above program, there are several other programs included. M, M2, and T5-ATR. These are old programs that were originally devised as a partial answer to the Magic ECM of Oct.6, 1999. They have been found useful in rare cases, to fix cards that no other program could fix. They should be considered as programs of LAST RESORT! There are several threads in the Unlooper Forum that go into some detail on their use. This guide does not recommend their use, unless you are absolutely sure you know what you are doing! One added note on the full DOS package. The speedup file in this package has had nearly 2000 cards run through it, making it one of the best available for the DOS Software.
Also, a recent addition to the DSS Underground Members File Section. is a DOS unlooper guide written by Vorlon001. This covers most of the necessary information on using all of the DOS unlooper programs. It also covers the SU2 chip mentioned below.
Owners of the SU2 chip
Yes, there is other DOS software out there. Since this chip has recently been offered by some of the clone manufacturers, it is briefly referenced here.
The software is Su2.exe and Su2v2.exe. It will operate only with the SU2 chip. While similar in appearance to Prog.exe, the program and the software in the Atmel chip of the unlooper has been altered to add glitch points that were not available in Prog.exe. This software is able to repair Magic ECM cards as well as some others. While not as widely used as the Wildthing Software, it does have a place in the unlooping community and deserves mention here. It has random glitching features and works very fast because it runs in the Dos mode. This software was also modified to run in a DOS Window! This will not work with the regular DOS programs written for unloopers. This software is covered in detail in my Dos Unlooper Guide. I did this because of it's ability to read and write to Black Sunday cards.
Setting Up And Configuring The WT 4.1
Software
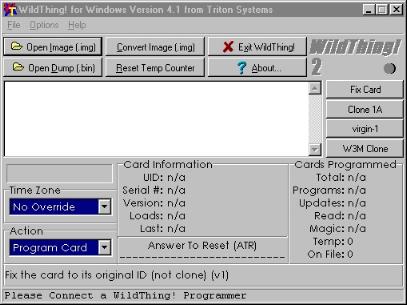
Setting Up And Configuring The WT 5.0a Software
The screen for the WT 4.1 program is shown above. The screen for 5.0a is nearly identical. These programs are somewhat more involved than WT 3.0. The options menu allows you to setup the programs just as in 3.0. These programs are now included in the Unlooper Guide as they are often mentioned as options to use if Prog.exe and WT 3.0 fail to work. They require the WTII chip to operate.
The setup screen available under the options selection of the Menu allows for function setup.

Because of the many features of these 2 programs, it is beyond the scope of this document to fully explain their use, other than they perform in a similar fashion to the WT 3.0 software. It is recommended that you go to Triton's site and download the full documentation package for this software. http://www.watchintv.com/wilddownload.htm
Recently added to our Members Files Page is the above documentation in a zip file that can be read in a browser as it is in the HTML format. This is easier to use than purchasing a copy of Microsoft Word 2000.
These programs will often work when nothing else will. I will say at this point, that if you have a card with a corrupted ATR, use WT 5.0a, load a clone.img file. This will set the program to program a card. Insert the card into the unlooper and let it run. When the ATR catches, the card will be cloned and the corruption will be repaired.
Also worth mentioning, is that although these two programs have an image converter, you are better off to use Wbin2img.exe as your image maker. These programs converters had some problems that were difficult to correct for the casual user!
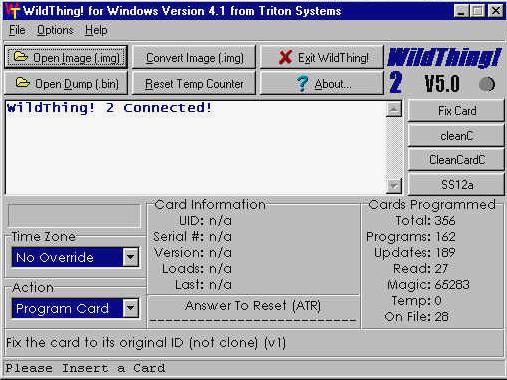
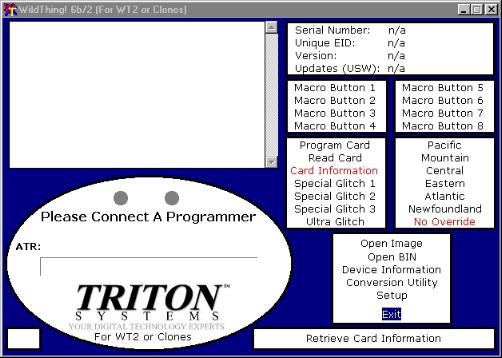
Setting Up And Configuring The WT 6 Software
As with the other windows software, unzip to a temporary directory and select Setup.exe. This program will install in a new directory in Windows/Program Files/.
While, initially, this software was protected and required the Wildthing X chip, newer versions have appeared that allow it's use with only the WTII chip. The program WT6-2v1 is available in the DSS Underground Members File Section. This is the recommended version of this program, because the X chip does not allow full use of the WT3.0 through 5.0a software and the WTII chip does. The program is functionally identical to the X software and performs the same.
The WT6-2v1 and 2 are also available in different colors. The file that has this is WTcolors.zip or similar as it was released under many different names. The file contains additional .exe files that come up in different screen colors for those that did not like the original colors in the first release.
While functionally similar to the 4.1 and 5.0a software, this software gives you access to the card file, has a better conversion utility, and it's main feature is adjustable glitch settings! It will also work with bin files as well as image files, something that none of the other Wildthing Software will do.
It is highly recommended that you use the following link and download the entire help file for this program at: http://www.watchintv.com/wilddownload.htm. While useful, the help file will only begin to explain the use of this advanced program! Since it's adjustable glitch settings feature is still being discovered, the best source of information on it's use is in the DSSUG Unlooper Forum itself. Some of the glitch points are posted at the top of the forum and users that discover new ones will often post them to help others.
Also recently added to the DSS Underground Members File Section. is a copy of the WT-X documentation, also in HTML format. This was simply converted from Word 2000 to HTML to make is easier to use. It can be read with a browser. A copy of this was forwarded to Triton as it is their documentation an was not altered except for format.
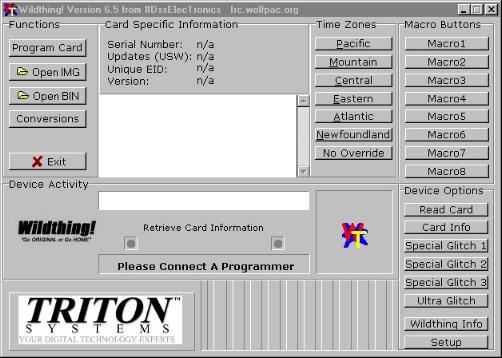
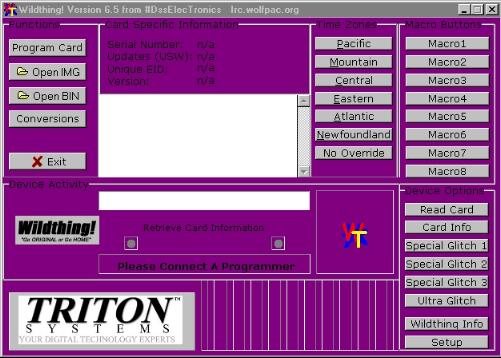
Setting Up And Configuring The WT 6.5 Software
While functionally similar to WT6.0, the new 6.5 software from Triton is using a cleaner and easier to use interface. What has been released, currently, is a beta version. All that is required is that the file be unzipped and the .exe file placed into the WT 6.0 directory. Another release has the colors options just like 6.0. You can look at the version you like and use it instead of the standard gray.
Dexter's BasicU

The first release of this program was BasicU.04. It implemented part of setup2 in the Wildthing program. It's main use was to unloop simple timeout 58/2a cards. While not a full blown unlooper program, it had features that made it attractive. It looks and acts similar to BasicH, a program that most testers were used to. It also implemented a feature that was not well documented. It was able to read cards that had a bootstrap loader installed on them to protect them from being read. This feature is useful in reading commercial cards! DO NOT USE THE PROGRAM TO ATR THE CARD! Simply insert the card, click on the magnifying glass, and the card will be read! You can then save the results as a .bin file as BasicU works with bin files rather than image files. This version of the program also contained a very useful tool by Dexter, called Hex Tool. This little jewel allow you to take 2 bin files and create an image file of the differences. Its use is described in detail in the DSSUG Unlooper Forum in a sticky thread discussing the 63 and the 67 updates. Used properly, this program can create images of 3m's, updates, and other minor card changes like clearing IRD numbers etc.
The second version of this program, BasicU.05 has been updated by BasicU.06. This program is also available in the DSS Underground Members File Section. It has the same ability to use a bootstrap loader to read a card and has the added ability to patch a loaded bin file with a Wildthing Image file! This feature is very useful for adding updates to an existing bin file. All that is required is to load a bin file, patch with the update image, and use the lightning bolt feature to write the updated image to a card.
The basicU programs, when used with the tools listed at the beginning of this guide, provide a novice unlooper user with all of the tools necessary to do routine card updates, with a minimum of difficulty. They come highly recommended. Their help file is easy to understand and their functions will be familiar to a user of BasicH 3.1a!
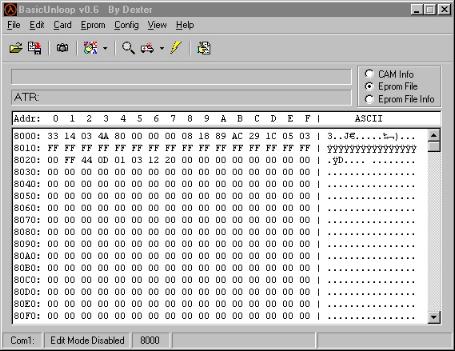
The open file icon allows you to load a .bin into memory just like in BasicH.

After you select the .bin and open it, the screen looks like the first one in this series. Just like BasicH, you can use the cleaning facility (ambulance icon) to clean an image in memory.
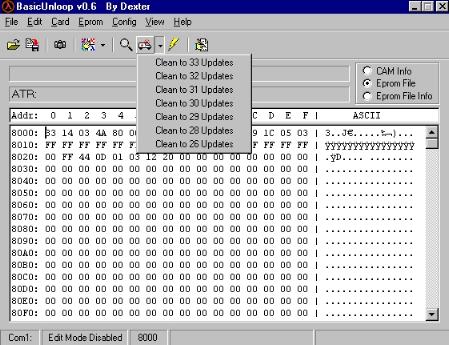
Limited, due to when it was produced, the cleaning ability is limited to 33-26 updates. However, due to the image patch icon at the top right, you can patch a cleaner image you downloaded or built for any update from 67 to 0 if you wish. You can patch in memory, multiple times.
Once selected, the patch is applied, whether a remover or adder. Once you image is cleaned to the level you want it, like in BasicH, you use the lightning bolt to write the cleaned or patched .bin to the card.
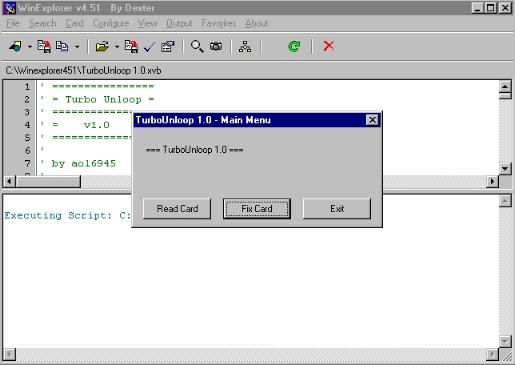
Dexter's Winexplorer4.51
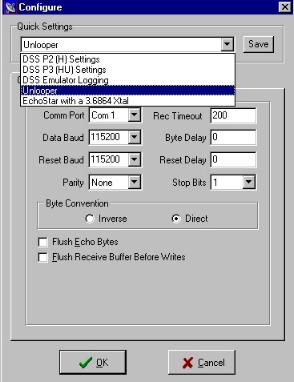
Although BasicU was great, Dexter's new winexplorer is even better! It has many added features, especially allowing it to use scripts to talk to an unlooper! The interface is as it always was, but note the new settings under the quick settings icon!
Selecting the Unlooper selection will allow Winexplorer4.51 to talk to an unlooper via scripts. This feature made it possible for AOL6945 to write the TurboUnloop series of scripts. These can be used to unloop virtually any looped H card that is not damaged. To select this, simply select the script as you did with earlier versions of Winexplorer!
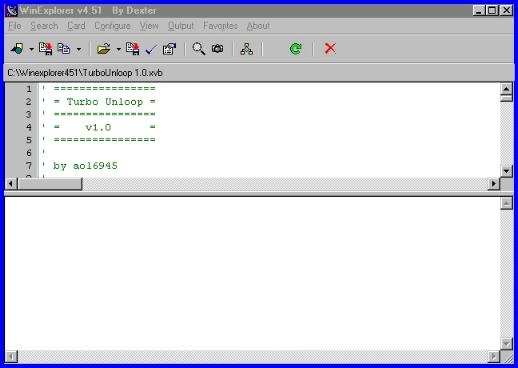
Once selected, all you have to do is select the run script icon and you are unlooping!
Other Unlooper Reference Materials
Also on this site is the Dos Unlooper guide that I wrote. It covers the DOS programs used by the unloopers and has been recently updated to include a lot of Su2 information.
We strongly suggest that you download and
read the WildThing! Help
Document, which is an
excellent document from Triton Systems and who produced the WildThing 3.0
unlooper software and the original WildThing 1 and 2 Unloopers.
Also as always, the DSSU Unlooper Forum is available to go seek out any
additional information or help.
There will be constant updates in the DSS Underground Members File Section. with new images, documentation, and available programs.
This page copied from the VorlonHomeworld! And of course, you can always find the latest stuff here on the Homeworld!
![]()
This site Copyright 2001 by Vorlon001 all rights reserved.